IT and/or Application Administrators can now create custom Warehouse tables in the FAST Reporting applications including Student, Finance, HR and Budget and Forecasting. The Warehouse Builder will now allow clients to extend their own FAST Warehouse by building their own warehouse tables. The new toolset will also track any changes made to those tables in an archived report.
This function should only be attempted by IT staff or high level power users in the applications; serious complications could result if executed improperly. If you do not have the necessary technical resources at your institution or in your unit, you may request that Millennium build these warehouse tables for you; standard support fees may apply.
From the Administration Tab, select the Client Warehouse Builder and select Table Definitions.
The page displays as a typical Data Entry Grid.
To begin a new record, click + New and a blank row will display and highlight all mandatory fields in pink.

Include an Execution Order (optional): If you are building a warehouse table off of an existing warehouse table that you already built and require that Table B execute before Table A, you should indicate this in Step 1. If you leave this field blank, the tables will execute in alpha order. This step is reserved for those processes that are dependent on others.
Table Name: Give your new Warehouse Table a title. You are able to include up to 30 characters in the Table Name field.
Please Note: you should develop an institutional naming convention to identify the tables. Naming is crucial because you cannot use duplicate names across FAST applications. For example, if I use the title DEMO_TRACKING in the Budget and Forecasting module, I cannot use the same table name in any other FAST application.
To use an auto-generating number sequence in the custom report builder, we suggest that you use ctr[tablename] but you may use other coding as needed. Then on the Wizard step for Primary Key, you will select NextMaxValue.
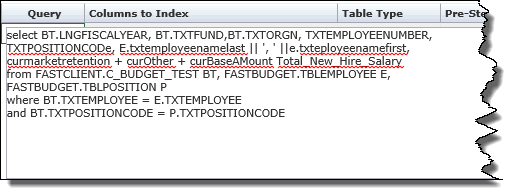
Query: Enter your query. This should generally be a cut & paste sql statement that you have created and validated using an Oracle application development (sql building) tool such as TOAD. You would generally not include a Select * statement in this field, but rather specify the necessary fields to include. All Views or Tables that you wish to use must have select privileges already granted to the FASTCLIENT warehouse. You can join tables, views or synonyms between applications as long as the Oracle grants exist.

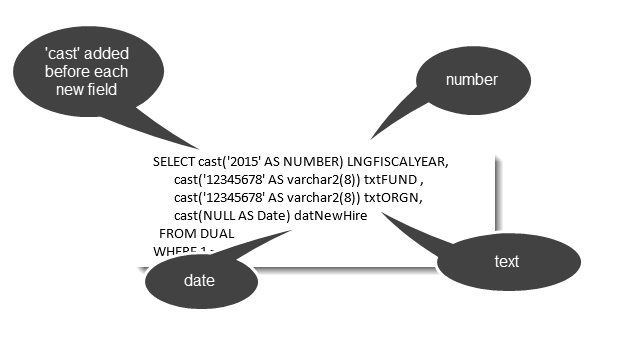
If you are using the Client Warehouse Builder to create your own custom data entry reporting pages, you also need to define the data types that will be included for each field. In other words, you need to define which fields are TEXT, DATES, NUMBERS so that the system is clear on what to do with those fields and the data within them.
TIP: A suggestion on how to capture these data types might be to include, as the first three characters, what the data type is.
Example: LNG = long; txt = text; dat = date field

Remember that queries can be increasingly more complicated and can also include formulas if you wish.
Tip: The use of the function 'cast' in the sample above is used before each data field in order to explicitly specify the data type for each field rather than allowing the database to try and interpret the data type. Since this is a warehouse tool, the system will increase the field size of the VARCHAR2 fields in order to try and future proof the tables from changes that may occur in the originating source.
Columns to Index: Include the columns that you wish to include as fields to filter on in your eventual query and/or reporting page. E.g. Fiscal Year, Fund, Employee ID, etc. Be sure to keep the naming consistent; the column names must match how you have named these fields in the query. Separate each field with only a comma.
Note: If the query being provided is aliasing any of the column names, those column alias' should be used, not the original column name.
Select a Table Type: From Constant (i.e. will stay and not become truncated); Stage or Warehouse. Stage files will create a mirror of the table across a DB Link.
Click Save to save your changes. When you click Save, an A_ and B_ and syn_ file will be created in the back-end of this table; a C_ object will be saved for constant tables. The necessary grant(s) will also be issued to the FASTCLIENT_QUERIES schema to make the query available using the FAST Query Builder as a new data object. The row will then be available to either edit or view as long as you did not select a Constant Table Type.
If the row is locked as indicated by grey shading and a lock icon under the Row #  . All edits will be tracked and can be reviewed at any time.

If you modify the query or the Client Warehouse data and re-save, the changes will be tracked under the Changes column on the far right hand side. You will notice that your change number is also a hyperlink:

If you click on (drill-down) to this number, you will automatically be navigated to the Client Warehouse Archive report which will show you all archived data, the Archive Date, the Created on Date and the Created By User ID.
If you select Populate On Save before saving your table, the warehouse builder will populate immediately. If you leave this field blank, it will run (and populate) with the next scheduled data refresh; this is the standard default.
Please Note: There is no restriction on size so be very careful about how large your dataset will be prior to clicking save.
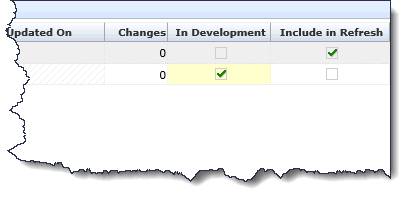
Finally, you may opt to select one of the following:

In Development: will now control if the query for a table can be edited. If this field is checked then the query can be updated, but you need to note that the existing table will be dropped and re-built resulting in all data being deleted
Include in Refresh: will control if the table is to be included in the scheduled refreshes. If this is not checked the table will be skipped by the refresh process. This can be used if you are still working on or needing to change a query for an existing table, or if you no longer want to warehouse the associated data but are not ready to remove the table, or if you are just using the table for data entry and so it does not need to be included in the refresh process.
Once your changes have been saved, your data warehouse object is now available for use, with all the appropriate select grants in place, in the FAST Query Builder. You can now create a custom query, a custom reporting page and/or a custom data entry reporting page.