Administrators using the Report Scheduler can now set report schedules to save the resulting file(s) to a network shared drive instead of e-mailing them to a group.
This is an advanced function that will need Millennium support to accomplish. Please email Customer Support for help when you are ready to begin.
To use this feature, a Scheduler File Share must be defined. This is a relative UNC network path from the web server or a local or mapped network drive on a web server.
For this process to work, the web server process must run under a [domain] account with read/write permissions to the file share.
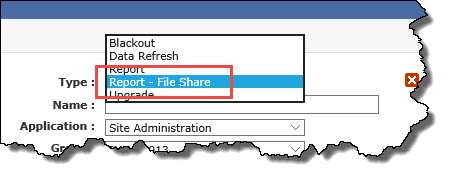
Once a share has been created you can create a Report Schedule like normal, but instead of selecting event Type = "Report", you will now select "Report - File Share".
To create a File Share Schedule:
Access the Report Scheduler Calendar page and click + to add a new event.
Select Report - File Share as the event Type:

Enter the criteria including Application (if applicable), Group, Report, Frequency, Interval, Start Date and Time. For more detail on these processes, please refer to the Report Scheduler Admin resource page.
Once the criteria has been set, choose your output format (PDF, Excel or CSV).
Select a destination Location from the drop-down options available (note: these options will already have been set-up using the Administration page). If you need to edit the locations, select the "Edit" button. You will not be able to delete a location that has already been used.
You can also select the "Static file name" indicator to overwrite the default behaviour which is to overwrite the file each time the report runs and delivers.
Click Save to complete the schedule.
To set-up the Scheduler File Share Locations:
From the Administration menu, select Report Scheduler -> Scheduler File Shares
Here you can add, view, edit or delete scheduler file share network locations.
To add, click + New and complete all mandatory fields.
To edit, simply click in any cell (e.g. Alias) to make a change; click Save to commit your edits.
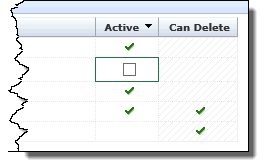
To delete, verify first that the "Can Delete" option is enabled. If this box is disabled, it means the path has already been used and cannot be deleted. If you can delete, simply click the Row # associated with the entry, highlight the row and click the red "delete" button:

If you cannot delete, you can opt to disable the network location, making it unavailable for end users to select. To do this, simply de-select the "Active" indicator:
