To manage the privacy/security or shared roles for your Pinned Reports, you must be:
An Application-level Administrator, and/or
A Site Administrator, and/or
Have the Create/Manage Group Pinned Reports Role within your application and be associated with one or more Groups to share with
If you meet one or more of these conditions, you're ready to create and share Pinned Reports with other groups on campus.
If you do not meet one or more of these conditions, you can still create and manage Pinned Reports but they will only ever be saved as "Private" which means you are the only person that can see, run, manage and delete those reports.
To start, create a Pinned Report from any Baseline or Custom reporting page. Be sure to use as many Filters, Advanced Options, Function-Based Filters and custom formatting as you like in order to customize the look, feel and display of the report before you save it.
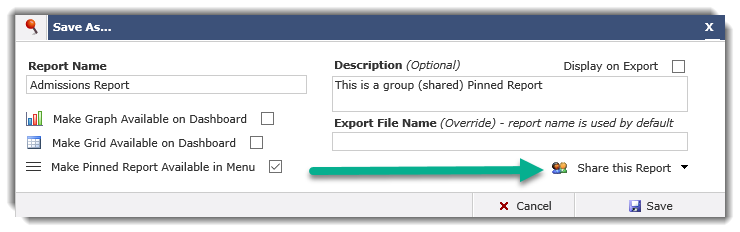
Once you have the report formatted to your satisfaction, click the Save As button to open the Save As dialogue box.
As with a standard or Private Pinned Report, you will be prompted to provide a Report Name (required) and a Report Description (optional).
You can also (optional) choose to select the Display on Export option if you would like the report description to be included when users export the data from FAST.
You can also (optional) select an Export File Name that differs from the Pinned Report Name.
You will also notice a Share this Report icon:
Open the Sharing Options to reveal the three types of Sharing that can be applied to this report:
Users in these groups can run this report: By assigning users to this option, the members of the group(s) assigned will be able to view and run the Pinned Report. It will be saved on the Pinned Reports Tab under the category of the Group(s). The only groups that will display in the drop-down are those that currently have Menu Access assigned to the report you're saving.
Users in these groups who are also in the "Create/Update Group Pinned Reports" role can run and maintain this report: If you assign a group the ability to run and maintain the Pinned Report and one or more users in that group have the role called “Create/Update Group Pinned Reports”, those users will also be able to maintain, modify and/or delete the Pinned Report as though they had created it. This is a great option when you're creating reports centrally but want the control and management of those reports to ultimately lie within a functional area or department rather than with the person who originally created it!
Users in these groups can run this report but won't be able to change any filters or options: This is a Read-Only assignment and provides very limited access that allows users to view the Pinned Report without being able to modify the base filter options, advanced options, change or add column filters, etc. They can see the report exactly as you've saved it, but that's it! Only the groups that do not have Menu Access to the report will appear in the Read Only sharing list. Here’s an important thing to consider about "read only" access: if a user is a member of a group that is set up as read only, but is also a member of another group which has normal menu access defined, the Pinned Report will not be read only for that user. Since the user has access to the base report through normal menu access they could just navigate directly to it and run it with whatever criteria they want, therefore the report will not appear as read only in this situation.
To review a list of the users in each group you've selected, click the View Users button to the right of the drop-down list.
Once you've made your selection, click Save to complete.
Once you have saved the Pinned Report to one or more Groups, they are ready to run and retrieve by the members of those groups on the Pinned Report Tab within the application and/or on the main menu of the reporting page where it was Pinned.
The Pinned Reports Tab on the FAST application Home Page and/or the FAST Home Page is divided into three distinct sections:
My Favorite Reports: These are the Pinned Reports that you have designated as part of your personal list of "Favorites"; to add reports to this list, locate a Pinned Report in either the Private or Group library and click the Star. To remove reports from this section, you can click the Yellow Favorite star again OR click the Delete button to delete it completely.
Please Note: You can only delete Pinned Reports that you have created or been assigned maintenance access to. If you choose to de-select the report as a "Favorite" it will simply fall back into the original Pinned Reports library it came from but you can still view and retrieve it at a later time.
My Pinned Reports: These are the Pinned Reports that you created and that you have saved as Private. No other users can see, run, edit or delete them.
Group Pinned Reports: This category is divided up by Group Name. All Groups that you belong to will appear on this list. In each list, you can see the Pinned Reports that have been assigned to each group. Depending on the access that has been defined, you may be able to view the reports, view and edit the reports, or you may only see the reports as "read only".
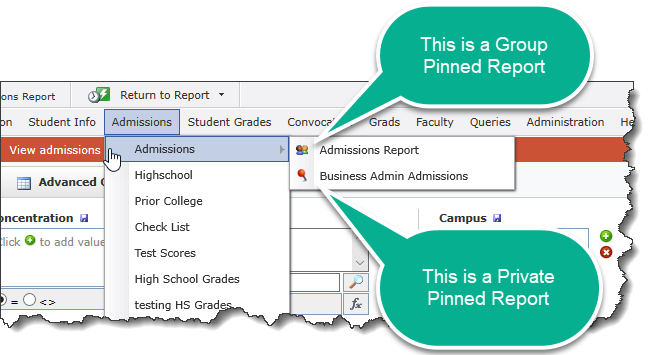
Once you know what reporting page the report has been saved on, it's easy to find the associated Pinned Report(s) to run again. Using this example on the Admissions report, you can see that one is the Group Pinned Report we created (notice the Group icon) and the other is a Private Pinned Report created from the same reporting page in FAST Student Reporting (notice the Pin, indicating a Private report):
You cannot save a Pinned Report to a Group if:
There are any Private Virtual Columns on the Report
The current report uses any Private Dynamic Selections
If this is the case, the Sharing Options will be greyed out and the following message will be clearly displayed:
Also keep in mind that your Pinned Reports are the base of all your Scheduled Group reports, graphs, grids and also Dashboards. It's important to understand the security and Sharing Options relating to Pinned Reports before moving on to the more complex layering of Graphing and Sharing Dashboards.
If in doubt, be sure to schedule some training to see these features in action!
![]()